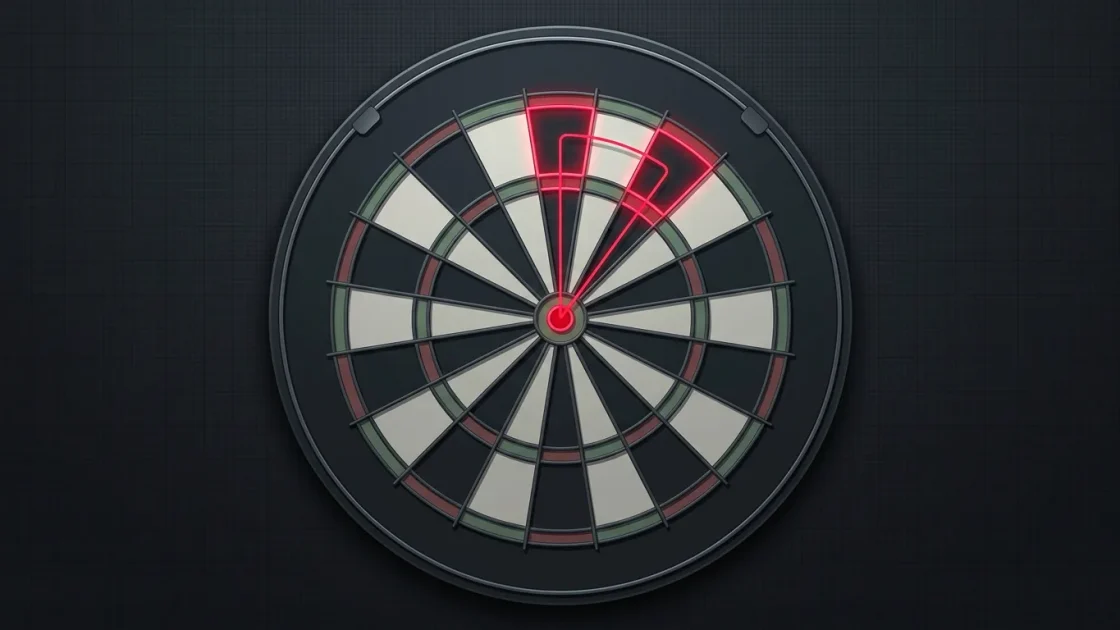
The highest checkout in 501 is 170: treble 20, treble 20, bullseye. Every score below it, except seven bogey numbers, can be taken out in three darts.
This page gives you the full 501 checkout chart from 170 down to 2, one recommended route per score, ready to print or save. Bogey numbers (169, 168, 166, 165, 163, 162, 159) can’t be finished in three darts, so you score down instead. Grab the printable version below, then use our checkout calculator to see alternate routes and what to throw after a miss.
A checkout chart tells you the fastest way to finish a leg of 501. You subtract every dart from your score, and the last dart has to land in a double or the bullseye to win. Once you drop under 170 you’re in checkout territory, and knowing the route on sight is what separates players who finish from players who freeze on 81 and throw three darts at nothing in particular. Legs are won and lost in that last stretch, so the finish is the part of your game worth the most attention.
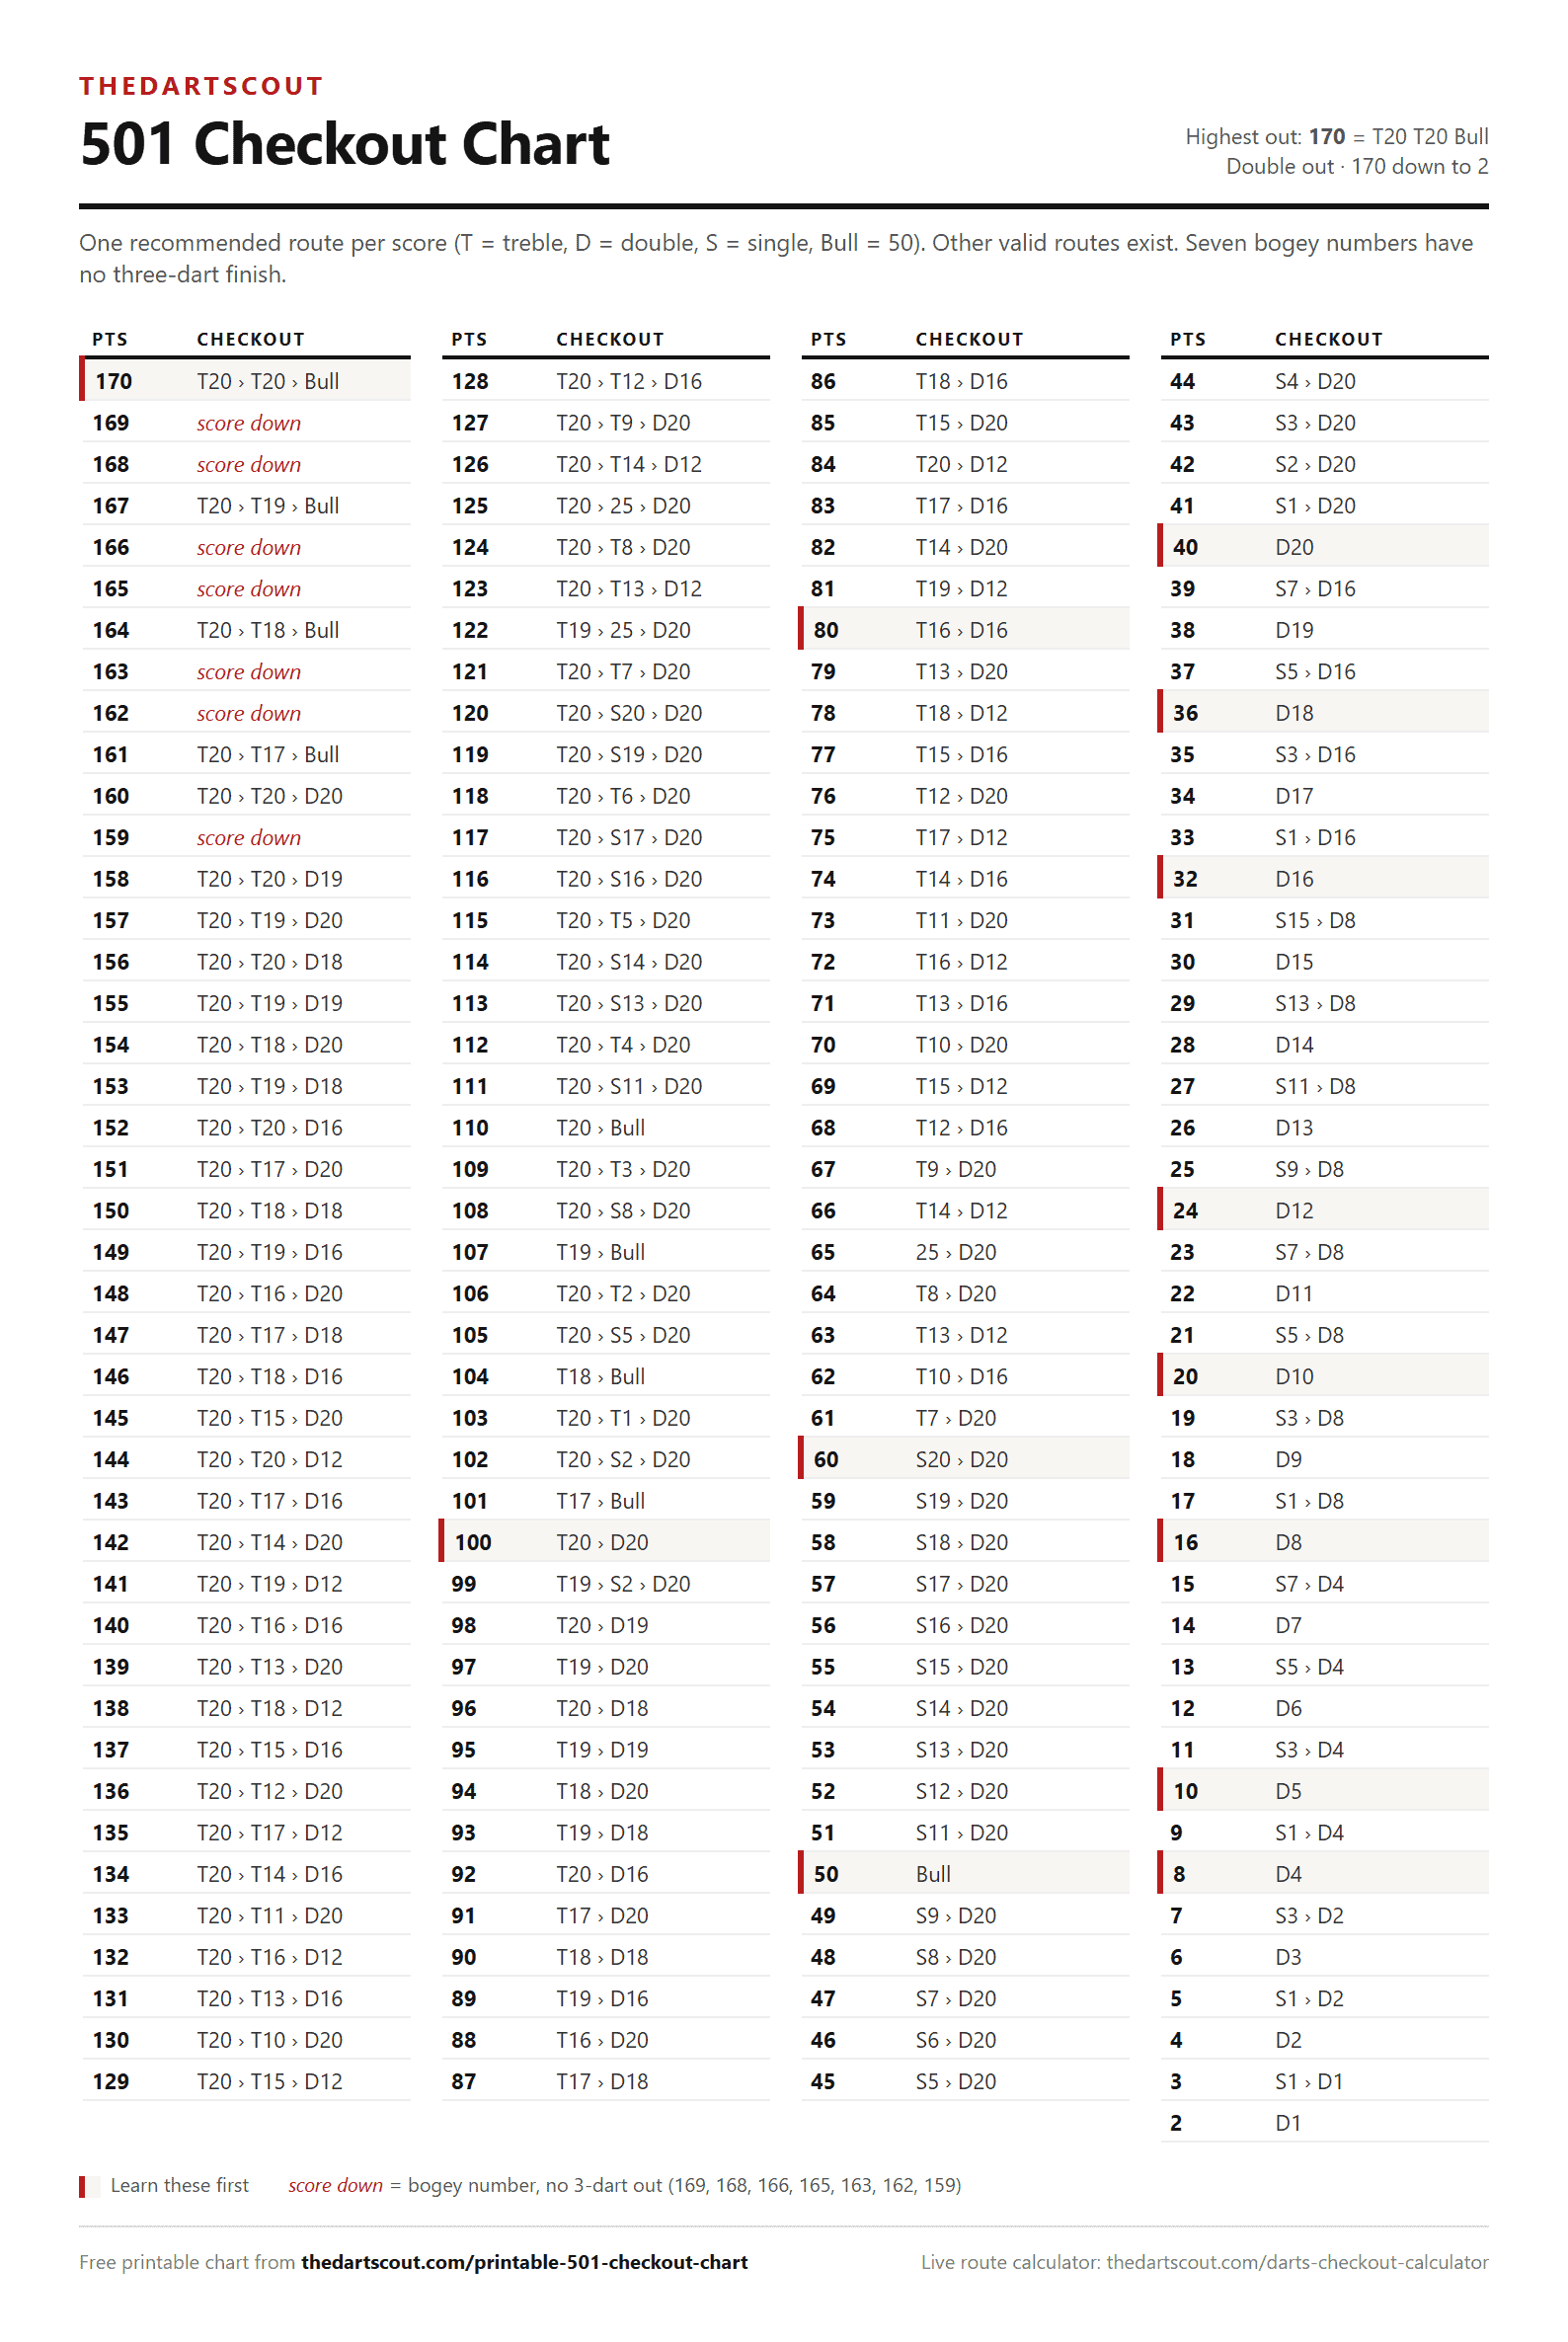
The chart below is the complete reference: every finishable score, its recommended three-dart route, and the bogey numbers you can’t take out at all. The routes are generated and arithmetically checked, every one sums correctly and ends on a double, and cross-referenced against the standard darts501 checkout combinations. If you want the theory behind why a route is chosen, read our 501 checkout strategy guide. If you want the data on how routes shift after a missed dart, see the checkout route data. This page is the thing you pin to the wall.
Free Download
The Printable 501 Checkout Chart
One clean page. Print it for the wall by the board, or save the image to your phone for the pub.
Download PDF (A4) Download Image (PNG)The Full 501 Checkout Chart (170 to 2)
Read it top to bottom, left to right. The score is on the left, the recommended finish on the right. Highlighted rows are the finishes worth committing to memory first, more on those below. Where you see “score down,” you’re on a bogey number and there’s no legal three-dart out, so you throw to leave yourself a clean finish for the next visit.
How to Read and Use This Chart
Every route is written in throwing order. “T20 › T19 › Bull” means treble 20 first, treble 19 second, bullseye to finish. T is treble, D is double, S is single, and Bull is the inner bullseye, which scores 50 and counts as a double. So a route that ends on Bull, D16 or D20 is a legal finish; a route that ends on a single is not.
The chart lists one recommended route per score, and it’s built to leave you on a comfortable finishing double, usually D20 or D16, wherever a choice exists. That matters because most scores have several valid routes. On 90 you could finish T18 then D18, or T20 then D15, or 20, T20, D5, all three land on zero legally. The chart picks the cleanest line so you’re not memorising three options for one number. When you miss, though, the picture changes fast: a single stray dart can turn a tidy 90 into an awkward 50, and the best route recalculates. That’s exactly what our checkout calculator does live, dart by dart.
Don’t try to learn all 162 routes at once. Learn the finishes under 100 that come up every leg, learn the three big ones at the top, and let the chart handle the rest until they sink in through play.
The Checkouts You Should Memorise First
You don’t need the whole chart in your head to win legs. You need the finishes that show up on almost every visit, the two-dart and three-dart outs under 100, plus a handful of landmarks. Drill this shortlist first and you’ll finish far more often than a player who’s still doing mental arithmetic on 68.
40 (D20), 32 (D16), 36 (D18), 24 (D12), 20 (D10), 16 (D8), 8 (D4). These are your bread and butter, the doubles you land on after a good scoring visit. Learn the double for every even number to 40 cold.
100 (T20, D20), 96 (T20, D18), 90 (T18, D18), 81 (T19, D12), 80 (T16, D16). One big treble, one double. These decide legs, miss the setup and you’re scrambling.
170 (T20, T20, Bull), 167 (T20, T19, Bull), 164 (T20, T18, Bull). You’ll rarely have them, but knowing them means you never waste a visit staring at the board when the chance comes.
The pros make this look automatic because it is. Across the 2024 PDC tour, tour-card holders finished roughly 37.5% of their checkouts in two darts, with more taken on the third. The top finishers in 2025/26 pushed past 50%. None of that comes from talent alone, it comes from knowing the route before the dart leaves the hand. For the practice side of turning these into muscle memory, see our guide on how to hit doubles.
Why 170 Is the Highest Checkout: The Big Fish
170 is the highest finish in 501, and there’s only one way to take it out: treble 20, treble 20, bullseye (60 + 60 + 50). Two limits set that ceiling. No single dart can score more than 60, and the last dart has to be a double – the biggest of which is the inner bull at 50. Two maximum trebles plus the biggest finishing double makes 170, and no arrangement of three darts can beat it.
The finish is nicknamed “the Big Fish” – the biggest catch a leg can offer – a name popularly credited to Sky Sports commentator Rod Studd. It has produced some famous moments. Phil Taylor hit one against his mentor Eric Bristow at the 1990 World Championship, the tournament where Taylor won his first world title. At the 2013 Grand Slam semi-final, Adrian Lewis landed one against Taylor while averaging 110.99 – and still lost 16-9.
It’s rare even at the top level. A 170 needs two darts in the 8mm-deep treble 20 bed and one in the 12.7mm inner bull, under the pressure of a finish – and a player has to arrive on exactly 170 in the first place. For club players, it’s almost always worth going for when you’re on it: two treble 20s and a missed bull still leave 50 for your next visit, and the practice on trebles and the bull pays off either way.
The bull finishes just below 170
- 170: T20, T20, Bull (60 + 60 + 50)
- 167: T20, T19, Bull (60 + 57 + 50)
- 164: T20, T18, Bull (60 + 54 + 50)
- 161: T20, T17, Bull (60 + 51 + 50)
Each one keeps treble 20 and the bull and walks the middle dart down one treble at a time. The scores in the gaps between them are the bogey numbers below.
Bogey Numbers: The Scores You Can’t Finish
Seven scores have no three-dart checkout: 169, 168, 166, 165, 163, 162, and 159. The maths simply doesn’t allow a combination of three darts that lands on a double and totals those numbers. If you’re left on one of them, stop trying to finish and start scoring down to a number you can take out.
Why they’re impossible: work backwards from the finish. The last dart has to be a double (at most 40) or the bull (50). Finishing on the bull, the first two darts would need to total 119 for 169, 118 for 168, 116 for 166, 115 for 165, 113 for 163, 112 for 162, or 109 for 159. Two darts can’t make any of those totals, because the only single-dart scores above 50 are 51, 54, 57, and 60 – so the highest two-dart totals run 120, 117, 114, 111, 110, and so on. Finishing on a smaller double only makes the gap bigger.
The classic trap is sitting on a bogey number and hammering treble 20 out of habit. The smarter play is to throw a deliberate single to leave a round, finishable number. On 162, a single 12 leaves 150, a clean T20, T18, D18. On 159, a single 19 leaves 140, then T20, T20, D10. Think one visit ahead and a bogey number costs you nothing.
If You Prefer a Different Finishing Double
This chart routes toward D20 and D16 because they’re the two doubles most players are most confident on, and because D16 has the best “halving” line: miss inside it and you’re left on 16, which halves cleanly to D8, then D4, then D2, then D1. You can stay on that side of the board through four misses. D20 is the most-thrown double on the professional tour and many elite players post their highest success rate there, but its halving line breaks quickly, 20 goes to 10, then 5, and 5 is odd.
If your money double is somewhere else, plenty of players swear by D10 or D8, you can re-route the setup darts to leave it. The trick is to aim your last-but-one dart at whatever leaves your favourite double: if D10 is the one you trust, work back to leaving 20 rather than 32. The chart gives you a sound default; your own consistency should decide the last dart. The checkout strategy guide walks through how to choose your preferred double and build your setups around it.
Interactive Tool
Work out any finish, live
The chart is the reference. The calculator is the coach, enter any score and it shows the best route, then recalculates after every dart, including your misses.
How to Practise Your Checkouts
A chart on the wall only helps if the routes are in your head by the time you’re standing at the oche. The fastest way to get them there is to practise finishing, not just scoring. Most players spend their whole session throwing at treble 20 and almost none of it on the doubles that actually close legs. Flip that ratio. Give the back half of every session to checkouts and your finishing percentage climbs within weeks.
Start with a simple drill. Put yourself on a score between 40 and 100, glance at the chart for the route once, then throw it for real. If you miss the setup, take the new number and finish from there without looking. The goal is to stop needing the chart for the everyday finishes, so that 68 instantly reads as treble 16 then double 10 and your eyes are already on the treble. Rotate through a spread of scores rather than hammering the same one, because in a game you never get the same leave twice.
Once the routes are automatic, the limiting factor becomes your double, not your memory. That’s a throwing problem, not a knowledge problem, and it’s worth training on its own. Our guide on how to practise darts alone lays out solo drills with scoring targets, and building a consistent dart throw covers the mechanics that make a double repeatable under pressure. Learn the chart, then groove the finish.
Frequently Asked Questions
What is the highest checkout in 501 darts?
The highest checkout is 170: treble 20, treble 20, bullseye. It’s the ceiling because the final dart must land on a double, and the bullseye (50) is the highest double available, three treble 20s add up to 180 but can’t finish on a double.
What is a Big Fish in darts?
“Big Fish” is the nickname for the 170 checkout – treble 20, treble 20, bullseye – the highest finish in the game. The name is popularly credited to Sky Sports commentator Rod Studd.
What are the bogey numbers in darts?
The seven bogey numbers are 169, 168, 166, 165, 163, 162, and 159. None of them can be checked out with three darts finishing on a double, so if you’re left on one you score down to a finishable number instead of attempting the impossible.
Why does the last dart have to be a double?
Standard 501 is played “double out,” meaning you must reduce your score to exactly zero with a dart in a double segment or the inner bullseye. Finishing on a single or treble, or dropping below two, is a bust and your score returns to what it was at the start of that turn.
Which checkouts should a beginner learn first?
Learn the double for every even number up to 40 (40 is D20, 32 is D16, 24 is D12, and so on), then the common two-dart finishes like 100 (T20, D20), 96 (T20, D18), and 81 (T19, D12). Those come up in almost every leg. The high finishes like 170 can wait.
Is double 16 or double 20 the better finish?
Double 16 has the cleaner recovery, miss inside it and you’re on 16, which halves to D8, D4, D2, D1 through four misses. Double 20 is the most-thrown double on the pro tour and many players are more accurate on it. The best double is the one you hit most consistently; this chart defaults to routes that leave D20 or D16.
Are the routes on this chart the only way to finish?
No. Most scores have several valid three-dart routes; the chart shows one recommended line that leaves a comfortable double. If your preferred finishing double is different, you can re-route the setup darts. Use the checkout calculator to see alternatives and the best route after a missed dart.